The macOS Ventura Privacy & Security Guide
The beginning of a new year is always a great time to revisit and refresh your digital security. For me, that means a deep cleaning of all devices. Often, I rebuild the operating systems on all of my hardware and optimally reconfigure my settings. This is quite easy for my daily Linux machine, especially with the various Linux Lifestyle articles from the past three issues. However, macOS is a different beast. The only macOS device I ever use is my OSINT machine which is a MacBook Pro M1. I choose this due to the virtualization options, and rarely touch the host. I explain more about that in the 10th edition OSINT book. Since I have several clients who rely on macOS products, I felt the need to create a macOS privacy & security protocol. The following assumes you are using the latest, fully-patched, Ventura operating system. Note that the commands in pure text are available HERE.
Phase 1: Update to Ventura
From your Apple device, apply all updates and fully upgrade to Ventura. This can be done on a "dirty" machine. We just need the OS to fully install before we reset the device, which will erase all data.
Phase 2: Complete System Wipe
First, make a backup of any valuable data. Common locations include the Desktop, Downloads, and Documents folders within the home folder of the current user. I prefer to use SuperDuper (https://www.shirt-pocket.com/SuperDuper) for this, as the backup is a true clone and bootable. Once complete, conduct the following (based on M1).
• Open System Settings and type "reset" in the search box.
• Select "Transfer or Reset" and click "Erase All Content and Settings".
• Enter your password, click continue, and confirm erase option.
• Allow device to reboot.
• Connect to Wi-Fi in the upper-right (Required for "Activation Lock").
• Allow activation to complete (enter account password if required).
• Click "Restart" when activation completes then click "Get Started".
• Select desired language and region.
• Click "Not Now" in the Accessibility screen.
• Click "Continue" without selecting a Wi-Fi network.
• Click "Continue" to confirm your choice.
• Click "Continue" on Data and Privacy screen.
• Click "Not Now" at the Migration Assistant.
• Click "Agree" to the Terms and Conditions and confirm "Agree".
• Provide generic computer name and secure password.
• Click "Continue" then "Continue without enabling Location Services".
• Click "Don't Use" to confirm choice.
• Choose your desired time zone.
• Disable all analytics options and click "Continue".
• Click "Set Up Later" for Screentime.
• Uncheck "Enable Ask Siri" and click "Continue".
• Click "Set Up Touch ID Later" and click "Continue".
• Choose your desired look and click "Continue".
Phase 3: Basic Software Installation
Next, Install Rosetta (only for newer Apple hardware), Homebrew (package manager), Task Explorer (identify suspicious processes), and KnockKnock (identify persistent malicious files). I run Task Explorer and KnockKnock weekly.
• softwareupdate --install-rosetta --agree-to-license
• /bin/bash -c "$(curl -fsSL https://raw.githubusercontent.com/Homebrew/install/HEAD/install.sh)"
• brew install --cask taskexplorer
• brew install --cask knockknock
Phase 4: System Configuration
Next, I like to modify all stock macOS settings which provide additional layers of privacy and security. I conduct the following.
• Open "System Settings" and search "Update".
• Click "Software Update" then "Automatic Updates".
• Disable "Check for Updates" and click "Done".
• Enter your password if prompted.
• Apply any pending updates and modify the following within "System Settings".
• BlueTooth: Disable Bluetooth
• Network > Firewall: Enable Firewall
• Notifications > Show Previews: Never
• Notifications: Disable "Allow notifications when the screen is locked"
• Notifications > Each app: Disable
• General > Date & Time > Source: Change to "pool.ntp.org"
• General > Sharing: Disable All
• Siri and Spotlight: Disable "Ask Siri"
• Siri and Spotlight > Spotlight > Disable all
• Siri and Spotlight > Siri Suggestions > Disable all
• Privacy and Security > Analytics > Improvements: Disable all
• Privacy and Security > Apple Advertising > Disable personalized ads
• Lock Screen > Require password immediately
• Game Center: Disable all
• Wallet & ApplePay > Disable "Add Orders to Wallet"
Phase 5: Change DNS
I have explained NextDNS within previous issues, and that is what I use. Something simpler which can be applied until you create a NextDNS account is Cloudflare. Their server addresses are 1.1.1.1 and 1.0.0.1. Within System Settings, conduct the following.
• Select connection (Wi-Fi or Ethernet) and click "Details".
• Disable "Limit IP address tracking".
• Click "DNS".
• Enter desired servers.
Phase 6: Security Settings
Enable FileVault for full-disk encryption at the following location.
• System Settings > Privacy & Security > FileVault
Next, open Terminal and consider the following commands.
• Disable Spotlight completely: sudo mdutil -a -i off
• Delete Spotlight index from root: sudo mdutil -X /
• Confirm indexing disabled: sudo mdutil -s /
• Disable Apple Asssessments: sudo spctl --master-disable
I disable Spotlight because I do not need or want it. This prevents Apple from digesting all of your files, emails, images, etc. I also disable Assessments because I already block Apple from verifying my apps, as explained later.
Phase 7: Apply Firmware Password (Intel only)
This only applies to older Apple devices, as M1 and newer machines have something similar enabled by default.
• Boot computer into Recovery Mode with CMD-R.
• Choose active account and enter password.
• Click "Utilities" in the menu then "Startup Security".
• Click "Turn On Firmware Password".
• Provide desired secure password.
• Quit and restart.
Phase 8: Little Snitch
This is the big one. Little Snitch is a software firewall which prevents applications from sending out data. This could be to block Apple from connecting to iCloud or to prevent Microsoft from sending analytics every time you open Word. For me, this is the most vital piece for a private macOS device. LuLu is a free alternative if you do not want to pay for Little Snitch, but I find the price to justify the advanced options.
• In Terminal: brew install --cask little-snitch
• Choose "Silent" mode for now.
• Deselect macOS and iCloud options.
• Open "Little Snitch Rules" from the menu bar.
• Click the "+" in the lower left and create profile titled "Apple Disabled".
• Click the "+" in the lower left and create profile titled "Apple Enabled".
• Click the "+" in the lower left and create profile titled "Apple Update".
• While in the "Effective in all profiles" section, disable all options, except "Allow outgoing connections to local network".
• From Rule Groups, disable all options.
• In the menu bar, change Profile to "Apple Disabled".
• Change "Operation Mode" to "Alert Mode".
• When prompted by any Apple service, choose "Any connection", "Forever", and "Deny".
Your machine will start annoying you. You will soon see why we want this software. Your Apple device is constantly calling home to send details of your usage. With Little Snitch, we can block all of these intrusions. As I write this, macOS Ventura possesses 64 Apple applications which send telemetry about you to Apple's servers. We can set this "Apple Disabled" profile to block all of them. However, there are exceptions. The following will allow Apple to see your DNS servers (to connect to the internet) and keep your time synchronized.
• mDNSResponder: Allow to connect to chosen DNS servers
• mDNSResponder: Allow connections from local network
• timeD: Allow to connect to new time server
I also allow all Apple services which ask to "Allow incoming connections from local network". This will keep various internal devices synchronized and my macOS virtual machines happy within UTM. If I were on a public network, I would disable all of these. At my home, I have no objection.
Next, let's continue configuring our "Apple Disabled" profile.
• Open all apps once and reboot, confirming to "Deny" everything.
• Continue until Little Snitch alerts are finished.
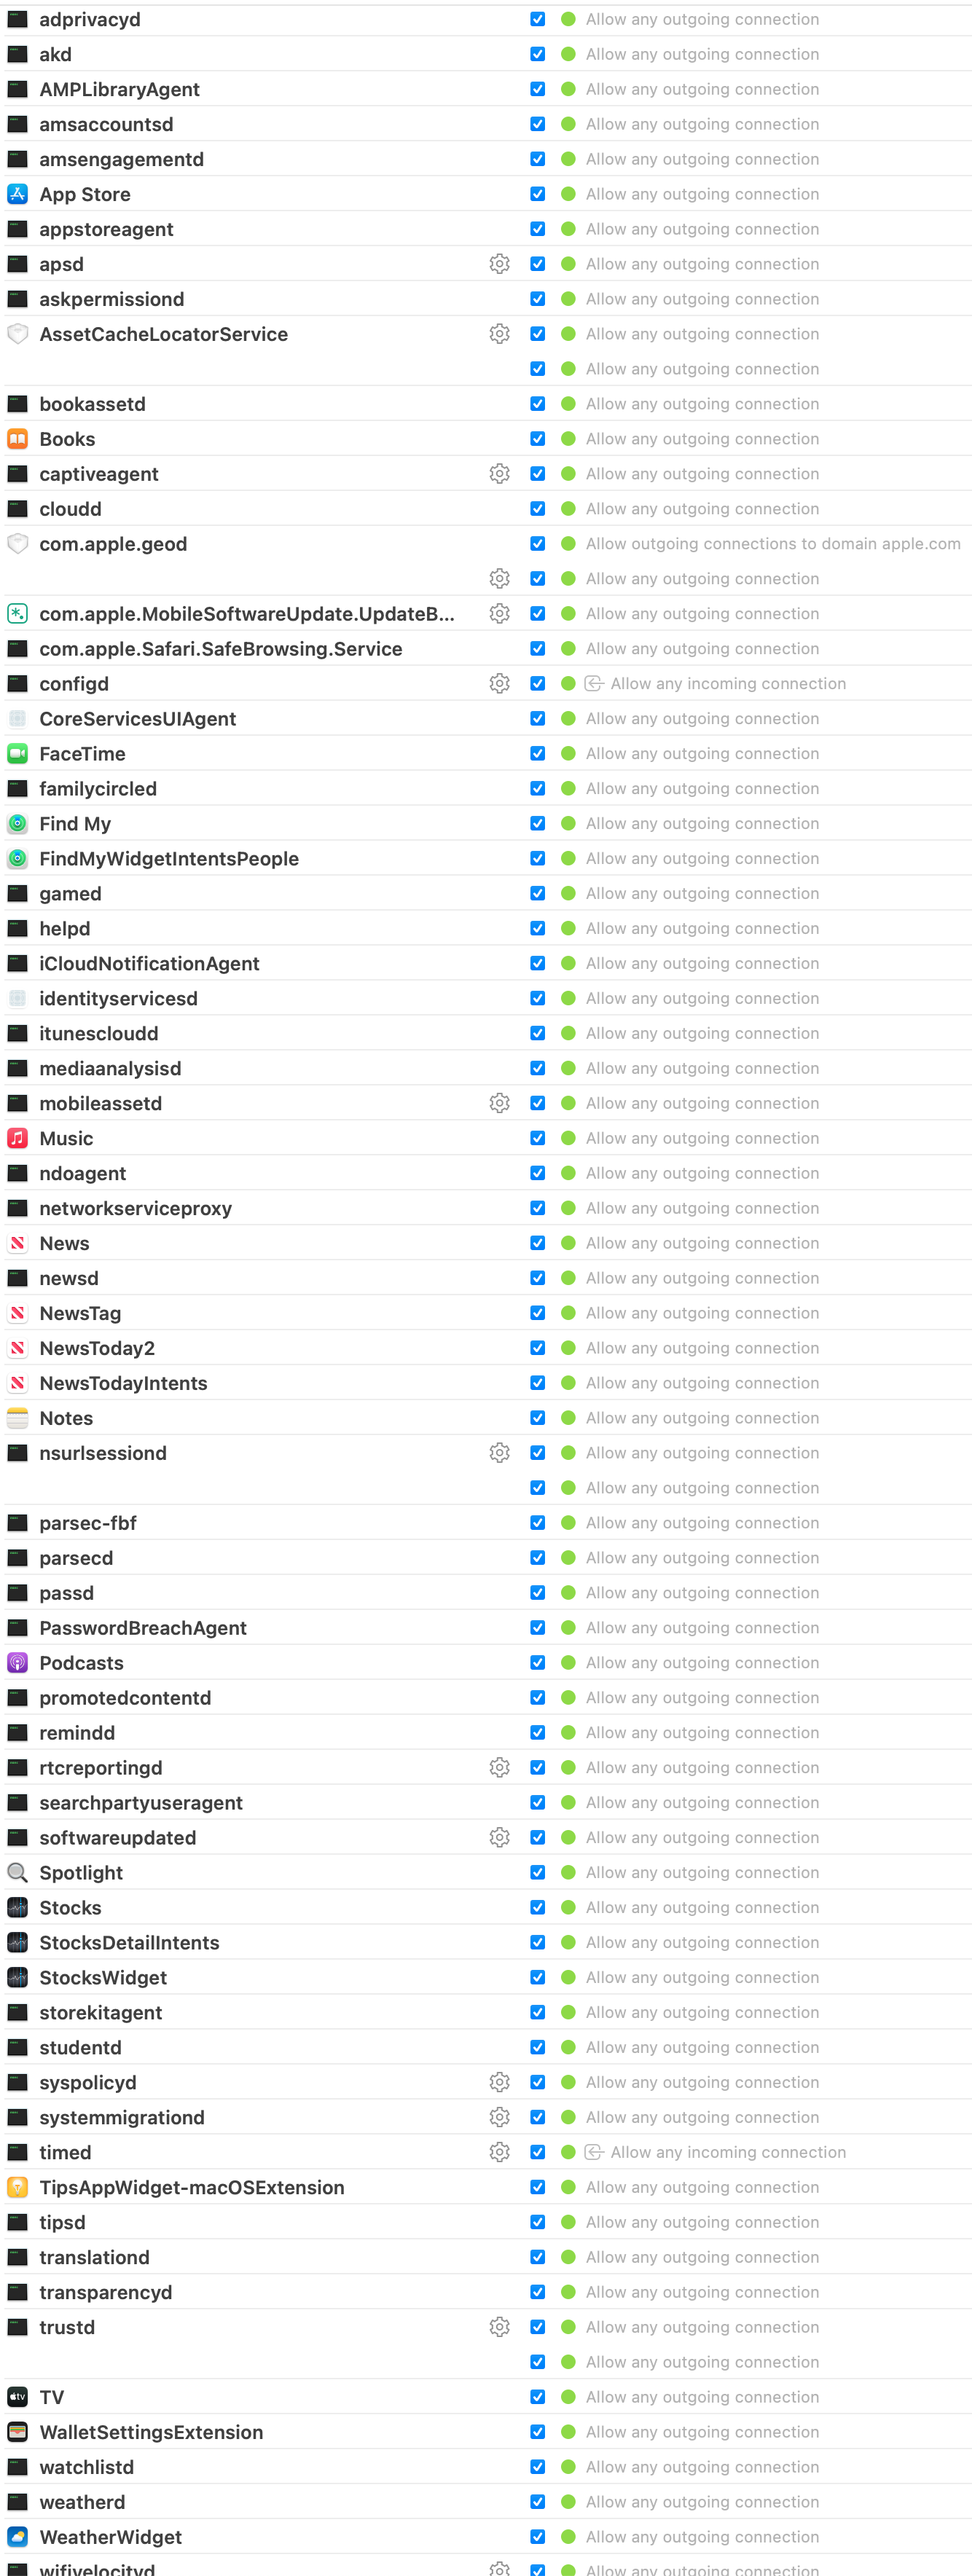
• Copy all "Apple Disabled" rules into "Apple Enabled" and "Apple Updated".
• Change all "Apple Enabled" rules to "Allow".
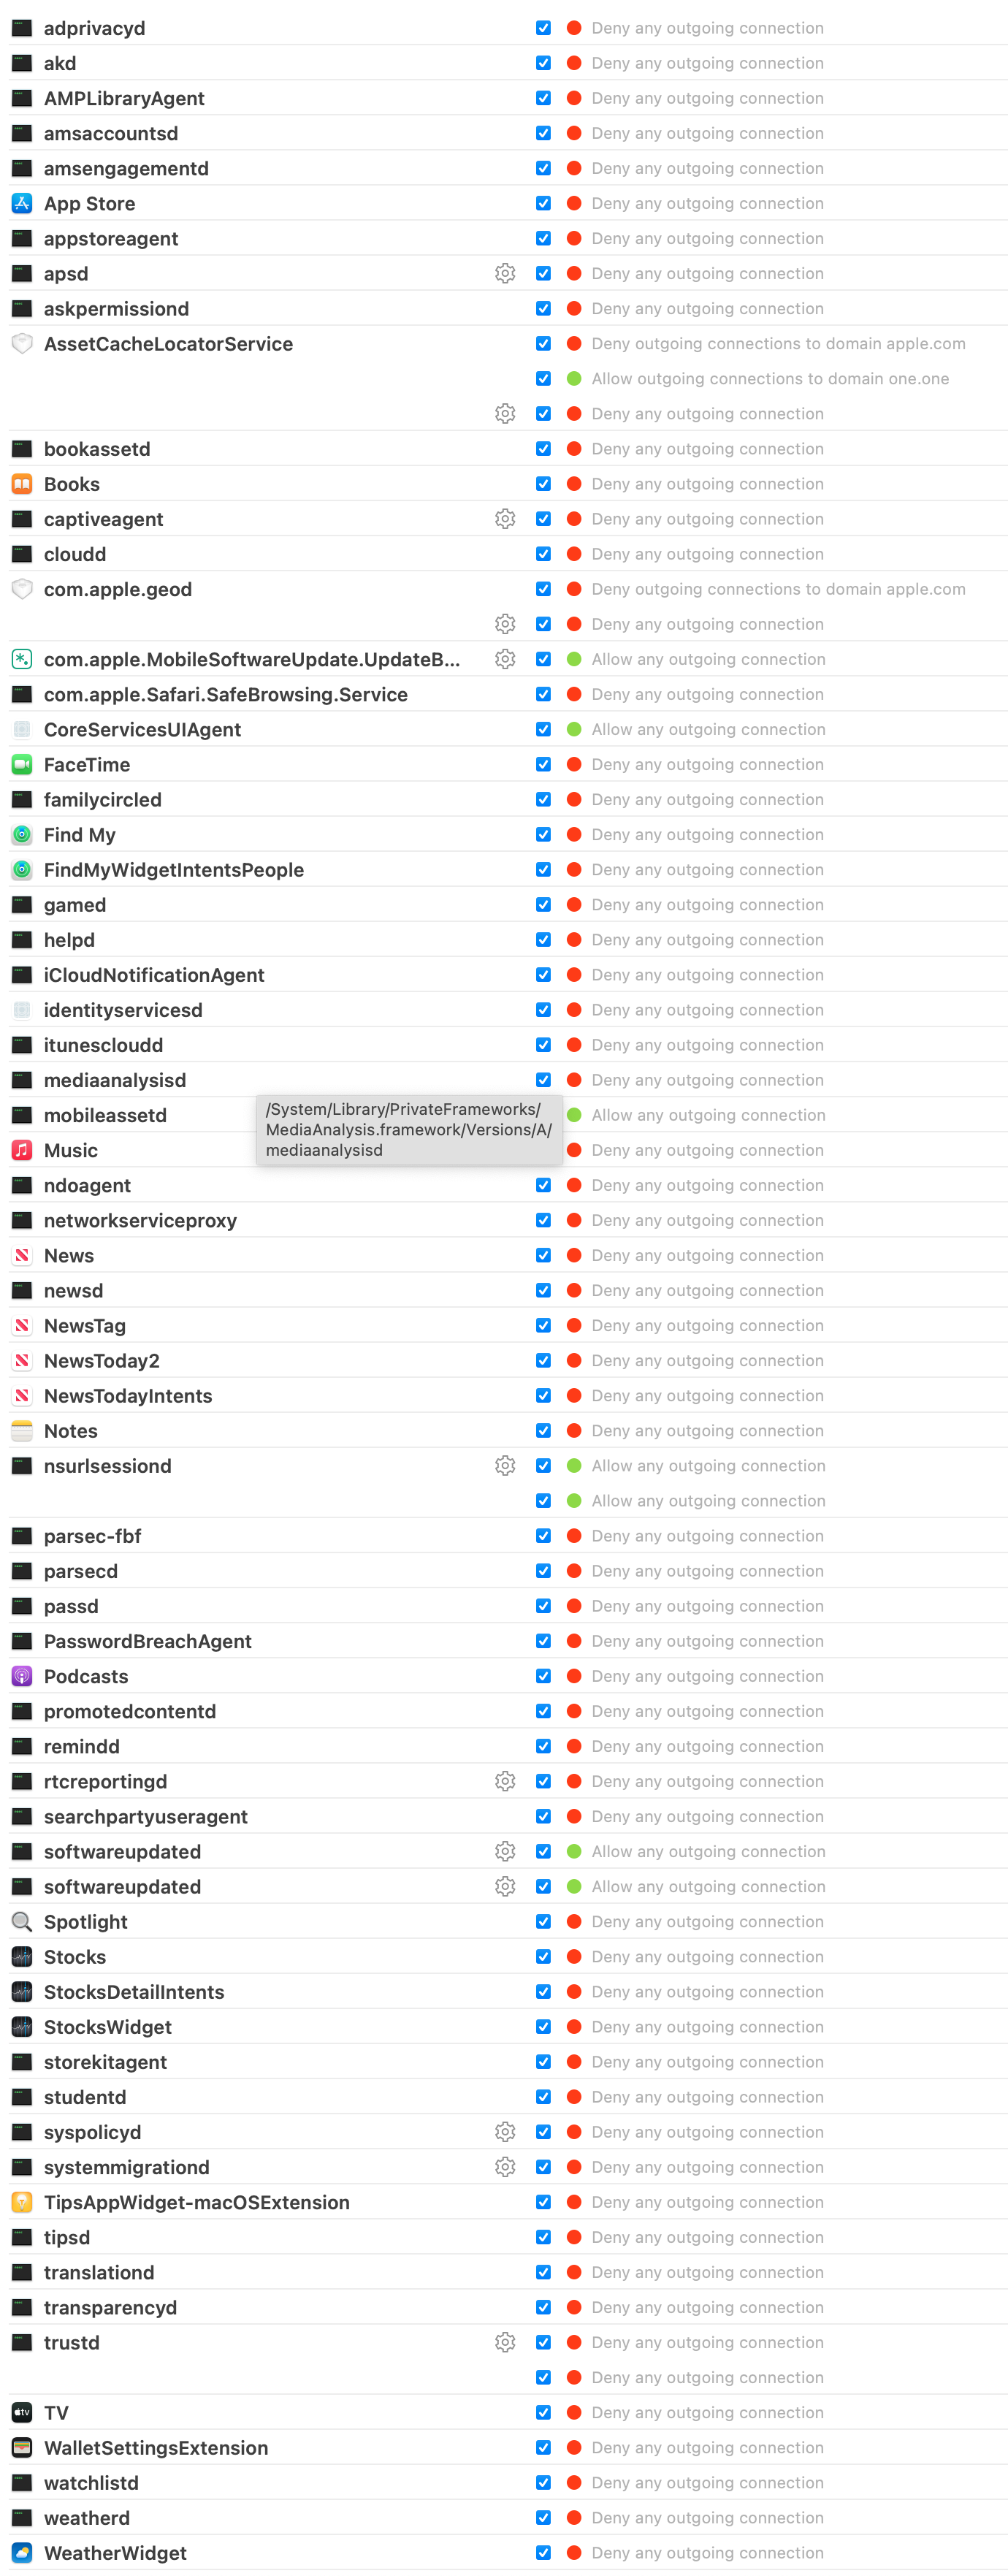
• Change "AssetCacheLocatorService", "com.apple.MobileSoftwareUpdate", "CoreServiceUIAgent", "mobileassetd", "nsurlsessiond", and "softwareupdated" in "Apple Updated" to "Allow".
These changes allow you to switch to other profiles when needed. When I want to check for updates and apply any pending upgrades, I select the "Apple Update" profile. It allows only the minimal services to send data. If I ever need to, I can allow all Apple services with the "Apple Enabled" option, but I would never do that. For daily use, I am always on "Apple Disabled".
Phase 9: Additional macOS Configuration
Next, let's use Terminal to confirm a few things. These commands can be beneficial when you simply want to make sure your settings are as desired.
• Confirm Spotlight: mdutil -s /
• Confirm FileVault: fdesetup status
• Confirm SIP: csrutil status
• Confirm Assessments: spctl --status
I like to make sure that undesired programs are not set to launch in the background upon boot. The following commands open the three most common places these programs hide. Once open, you can delete them from Finder if desired.
• open ~/Library/LaunchAgents/
• open /Library/LaunchAgents/
• open /Library/LaunchDaemons/
If I ever want to clear my Terminal history, I can conduct the following.
• rm -f ~/.bash_history
• rm -f ~/.zsh_history
The following clears macOS logs and cache files.
• sudo rm -rfv /Library/Logs/*
• rm -rfv ~/Library/Containers/com.apple.mail/Data/Library/Logs/Mail/*
• sudo rm -rfv /var/audit/*
• sudo rm -rfv /private/var/audit/*
• sudo rm -rfv ~/Library/Logs/*
• sudo rm -fv /System/Library/LaunchDaemons/com.apple.periodic-*.plist
• sudo rm -rfv /var/db/receipts/*
• sudo rm -vf /Library/Receipts/InstallHistory.plist
• sudo rm -rfv /private/var/db/diagnostics/*
• sudo rm -rfv /var/db/diagnostics/*
• sudo rm -rfv /private/var/db/uuidtext/
• sudo rm -rfv /var/db/uuidtext/
• sudo rm -rfv /private/var/log/asl/*
• sudo rm -rfv /var/log/asl/*
• sudo rm -fv /var/log/asl.log # Legacy ASL (10.4)
• sudo rm -fv /var/log/asl.db
• sudo rm -fv /var/log/install.log
• sudo rm -rfv /var/log/*
• sudo rm -rfv /Library/Caches/* &>/dev/null
• sudo rm -rfv /System/Library/Caches/* &>/dev/null
• sudo rm -rfv ~/Library/Caches/* &>/dev/null
• sudo rm -rfv /var/spool/cups/c0*
• sudo rm -rfv /var/spool/cups/tmp/*
• sudo rm -rfv /var/spool/cups/cache/job.cache*
• sudo rm -rfv ~/.Trash/* &>/dev/null
• rm -rfv ~/Library/Developer/Xcode/DerivedData/* &>/dev/null
• rm -rfv ~/Library/Developer/Xcode/Archives/* &>/dev/null
• rm -rfv ~/Library/Developer/Xcode/iOS Device Logs/* &>/dev/null
• sudo dscacheutil -flushcache
• sudo killall -HUP mDNSResponder
• sudo purge
The following disables all leftover Siri services.
• defaults write com.apple.assistant.support 'Assistant Enabled' -bool false
• defaults write com.apple.assistant.backedup 'Use device speaker for TTS' -int 3
• launchctl disable "user/$UID/com.apple.assistantd"
• launchctl disable "gui/$UID/com.apple.assistantd"
• sudo launchctl disable 'system/com.apple.assistantd'
• launchctl disable "user/$UID/com.apple.Siri.agent"
• launchctl disable "gui/$UID/com.apple.Siri.agent"
• sudo launchctl disable 'system/com.apple.Siri.agent'
• defaults write com.apple.SetupAssistant 'DidSeeSiriSetup' -bool True
• defaults write com.apple.systemuiserver 'NSStatusItem Visible Siri' 0
• defaults write com.apple.Siri 'StatusMenuVisible' -bool false
• defaults write com.apple.Siri 'UserHasDeclinedEnable' -bool true
• defaults write com.apple.assistant.support 'Siri Data Sharing Opt-In Status' -int 2
Finally, the following disables various remote connections.
• sudo systemsetup -setremotelogin off
• sudo launchctl disable 'system/com.apple.tftpd'
• sudo defaults write /Library/Preferences/com.apple.mDNSResponder.plist NoMulticastAdvertisements -bool true
• sudo launchctl disable system/com.apple.telnetd
• cupsctl --no-share-printers
• cupsctl --no-remote-any
• cupsctl --no-remote-admin
I know this seems like a lot of work. As a reminder, I placed all commands provided here on my site at https://inteltechniques.com/data/005.txt for easy copy and paste. Once finished, you will have the comfort of knowing you have stopped 99% of Apple's intrusions into your daily life. Or, this will convince you to move to Linux. Either way is a win.
The images below display full configurations for the Apple Disabled, Apple Update, and Apple Enabled Little Snitch rules.
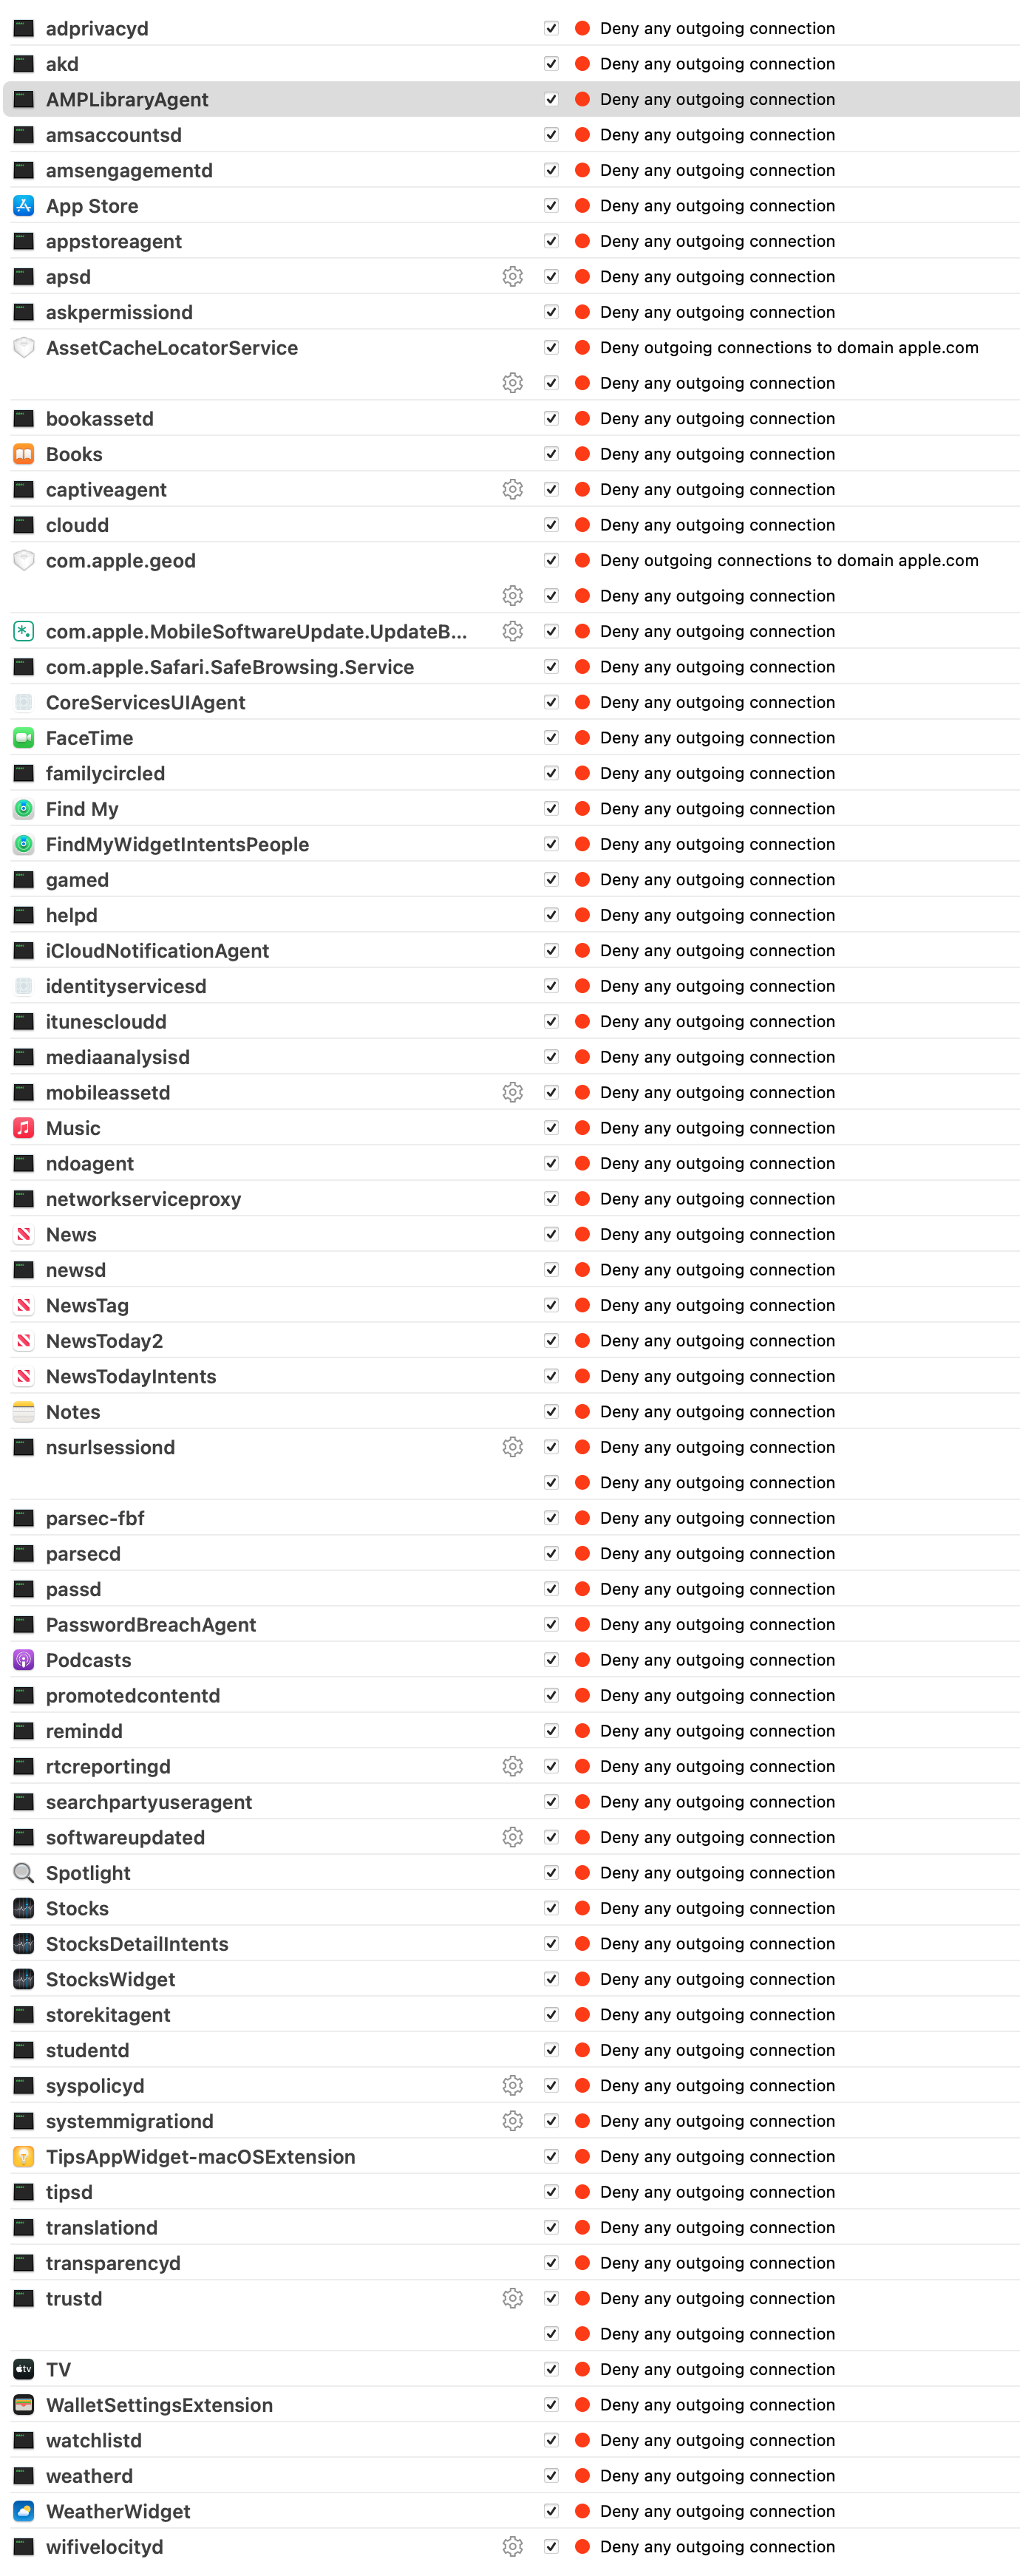
The following text identifies the Apple applications and services which send telemetry by default on a stock macOS installation without connection through an Apple ID.
adprivacyd
akd
AMPLibraryAgent
amsaccountsd
amsengagementd
App Store
appstoreagent
apsd
askpermissiond
AssetCacheLocatorService
bookassetd
Books
captiveagent
cloudd
com.apple.geod
com.apple.MobileSoftwareUpdate.UpdateBrainService
com.apple.Safari.SafeBrowsing.Service
CoreServicesUIAgent
FaceTime
familycircled
FindMy
FindMyWidgetIntentsPeople
gamed
Resources/helpd
iCloudNotificationAgent
identityservicesd
itunescloudd
mediaanalysisd
mobileassetd
Music
ndoagent
networkserviceproxy
News
newsd
NewsTag
NewsToday2
NewsTodayIntents
Notes
nsurlsessiond
parsec-fbf
parsecd
passd
PasswordBreachAgent
Podcasts
promotedcontentd
remindd
rtcreportingd
searchpartyuseragent
softwareupdated
Spotlight
Stocks
StocksDetailIntents
StocksWidget
storekitagent
studentd
syspolicyd
systemmigrationd
TipsAppWidget-macOSExtension
tipsd
translationd
transparencyd
trustd
TV
WalletSettingsExtension
watchlistd
weatherd
WeatherWidget
wifivelocityd
Hopefully you see the value in blocking the constant telemetry being sent to Apple servers about the ways we use the machines which we purchased.
Privacy Book
Our latest (4th Edition) book on Extreme Privacy is now available. Click HERE for details.